Email me
Showing posts with label crafts. Show all posts

Monday, June 24, 2013

It Was A Weekend?

This will be a short one.  I'm not feeling it today.

Unfortunately, this past weekend was a working weekend.

For several days, I have been working to get my resale site up and active.  It's doing pretty well.  It's all secondhand items right now, but I'm hoping that I can start adding my upcycled items soon.

So...about my weekend...

Friday was horrible.  I had a migraine all day long.  My migraines are motion sensitive.  All I wanted to do was curl up in my bed.  No such luck my friends.

Saturday was slightly better, but not by much.  I had intended on taking P to see the new Monsters movie, but my migraine wasn't gone yet.  And I still had a lot of work to do.

Sunday was a huge relief.  My migraine was gone.  I woke up feeling pretty good.  I had the house totally halfway cleaned by 10:30am.  I had a little meeting at noon and then P and I came home and just hung out all day long.


I put the girl to work.

The kid needs to know how to work a power tool.

I was redoing a telephone/printer stand.  I figured she could be kept busy while I got some other work done.  
 Sanded and Painted
It still needs one more coat and some new hardware.


I've talked before about my jewelry box here.  I wasn't loving the pink/white chevron background anymore.

I've been looking for fabric that went with my room, but didn't match exactly.

I found this cute pattern and while P was bathing the sawdust off, I finished this to-do item.  Check!

I like it a lot better.


The remainder of Sunday was filled with sewing up scratch marks on my chair and cutting fruit for this week.  We party hard y'all!!

I hope everyone has a good week.  Check back tomorrow.  I'm sure I'll have something slightly more interesting.

Until next time...


Pin It!

Thursday, May 23, 2013

Some Weekly Pinspiration: A Lace Skirt Extender

Weeks ago, P and I were shopping and she took off.  This is nothing new.  No matter how much I scare the crap out of her concerning bad people, her innocent little heart doesn't get it.  But, I digress.

When she came running back, she was so excited.  She had a shiny pink dress in her hands.  She said "Look Mom!  You should get this."  It was actually really cute.  It was a large so I didn't have high hopes.  But I tried it on and it fit.  And it was cute!  It was a  little on the short side, but I bought it anyway.

And it has sat on my dress hook for about a month + because it is too short to wear for normal everyday attire.

One day, I was poking around Pinterest and I came across this little gem.  You can actually purchase this at ThreeBirdNest on Etsy for $34.99.  Wow.  That's just crazy.

I needed this...for so many reasons, but I was not about to pay that much for a piece of fake silk and some lace trim.  Really?  No.  So, I decided to make my own.

I bought a little black half slip from Wal-Mart.  It was $4.96.  I bought some black lace trim from the fabric section at Wal-Mart (2 1/2 yards for $4.93).  So, for a grand total of $9.89, I had my supplies. A third of what I would have paid...actually a fourth if you included shipping.


So here is what I used...


* Vassarette Half Slip (size large) 24 in long
* 2 1/2 yards black lace trim (not ribbon)
* my sewing machine!


I always end up doing things the hard way...mainly because I don't pay attention to all the details.  This particular slip had a slit up the side.  For $5 bucks I was going to maker it work.  I just figured i would sew up the side...easy peasy.  Yeah not so much.  It was also curved, so after it was sewn up, the one side was still curved.  I just hiked up the hem line...sewed it and then trimmed it off.  It really did not need all that length anyway.


Getting ready to pin the hemline


 I pinned the hemline and the lace trim all at the same time.  Two birds, one stone.  I sewed one side at a time for the first layer.  After I sewed this side, I flipped it over and pinned again.  Then sewed. 


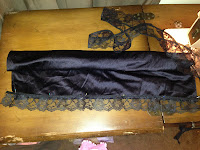
When I was done sewing the first layer, I had this pretty little lacy slip.


Next up, I started pinning my second layer of lace trim.  This was much easier.  I pinned all the way around this time.  I kept sewing til I was done.
My "vintage" double layer lace skirt extender


Please excuse the poor pictures.  It was after midnight and a drink might have been had beforehand. 

All in all, I think this slip turned out really well.  I can't wait to wear this dress now.  P will be so excited!

The best part about this project is that you can do this easily.  You don't have to have a sewing machine.  This can be done by hand.  You can do this in any color.  And you can even funk it up if you want to.  You can do a half slip or even a whole slip.  You can find slips at resale shops and places like Goodwill for super cheap.

I hope you've all been inspired to go make something pretty!

Oh and check back tomorrow for an awesome recipe for some fun foods.


Pin It!

Thursday, May 16, 2013

Building a Jewelry Display

Today, I wanted to tell you about my jewelry display. I am absolutely loving this. It's functional. You can decorate it any way you choose, so it makes a great decorative addition to your room.   You can also make this any size and change up the smaller details to fit your needs.

What you will need (for this particular style):
 *All items can be purchased at Lowe's or Home Depot.

- Sheet of thin plywood (depending on the size you want your display to be)
- 2 x 4 lumber (amount needed will also depend on the size of your display) *also, you will need the sides cut to create a frame for your back.
- various sized dowel rods
- hooks from the hardware section
- painter's tape
- paint (I used acrylic from the craft section at Wal-Mart)
- screws
- wood glue
- drill and saw


I knew I wanted a chevron background.  So I began by painting the plywood solid white.  It took a couple of coats.  After that had dried, I used the painter's tape to mark off where I wanted the board cut.  (I had to take it to my parents house because it's just not feasible for me to own a circular saw in my apartment!)


I went ahead and did my measurements and marked off my chevron stripes.  I first decided how many points I wanted (I regret not doing 2 full v's).  I used the vertical tape to mark the points.  Then I just connected the vertical tape with painter's tape and you get this!  At this point, the smartest thing to do would be to go back and trim the vertical tape off so you only have the chevron stripes in tape.  (I did not do this.  I was a moron and created a shit ton of extra work for myself)


I didn't have the patience to wait for the board to be cut, so I went ahead and painted my stripes. A very good tip I have learned to stop bleeding is to paint over your tapes edges with the color that is UNDER your tape.  That way, when the color bleeds, it will bleed the same color.  Once you have done that, you can paint your background.  I chose pink.  Peel your tape while the paint is still wet.

After the back dried, I took it to be cut down to the size I needed.


 I missed some photo ops. The next step would be to take your 2 x 4 pieces and screw them together to form a frame.  I primed my frame and started painting away.


Again, missed photo ops.  After the frame dried, I flipped it over.  Laid the back on top.  And screwed it all together.  Just a tip...make sure the boards you purchase aren't warped.  


After you have everything all together, you will get to add the details.  I added small white hooks to the top for necklaces.  Originally, I was going to put a rod all the way across, but I didn't like that it would interfere with the hanging necklaces.  I cut my dowels rods so that the larger ones would only go a small way across.  I drilled holes in the sides and screwed the dowel rods into the sides.  The tiny dowel rod was slide through drilled holes on either side.  I placed tiny dowel rods vertically into drilled holes on the bottom.  I used the wood glue to helped keep them secure.


I am very pleased with how this turned out.   I may at some point repaint the background.  But the design is awesome!!

Hope this inspired you to go build something pretty!!


Pin It!

Thursday, May 9, 2013

Weekly Pinspiration

For this weeks post, I went through my photos and found these two fun giftables.


The first PINspired craft is this awesome coaster set.  You can find the pin here.  And here is the photo. See.  They are really cute...and easily personalized.  I made sets for my family and made two sets for my own home.  Below are the ones I made for me.


Those adorable faces!!  The top row is of my great niece Anna (our little beauty queen) and my little monkey, P.  The bottom row starts off with my nephew (my friends grandson...but he might as well be my blood...he's the male version of P), Daniel.  Next, is my great nephew, Connor (this is my absolute favorite picture of him...so pensive)...and lastly...a picture from Christmas (2 years ago).


The photo coasters are a little tricky.  You have to print pictures on tissue paper, which is the hardest part.  But they do turn out nicely.

 I made these coasters to match the decor of my office.  I used wrapping paper and mod podge.  Super easy.

And the tiles are easily and fairly cheaply purchased at Lowe's or Home Depot in the tile flooring section.


This next crafty project is for the sewers out there.  This makes a great baby/kid gift.   You can find the pin here.    And here's the cute little professional looking photo.  I love owls.  I think this project is what started it.

I have a little how to for this craft...in the form of pictures.


I started off with a drawing.  I used my drawing to make actual size drawings.  Then I cut them out and used the pattern to cut my fabric.


Here is a picture of all the pieces laid out.  At this point, you will want to sew the face pieces on to the front side of your owl.


By the way, this is a sew by hand kind of thing.  Now, you have a front piece and a back piece.


Put your pieces together, right sides facing each other.  Sew around the outer edge...leaving a small hole (I chose the bottom part) to turn out and stuff.  Carefully, turn out.  And stuff.  I would suggest over-stuffing because it will loosen up and deflate over time.  Sew up your small hole and you now have a cute little owl.


There you have it.  Fun crafts.  Cute gifts.

Happy Pinning!


Pin It!

Thursday, May 2, 2013

Weekly Pinspiration

This weeks Weekly Pinspiration incorporates two of my favorite things...eating and sleeping.  Again, these crafts and recipes have long been made.  I'll begin the new "how to" or "how I did it" blogs after this semester is over in a couple weeks.  If you need more information than I give, just shoot me an email.  I'd be happy to help!


First up is one of my favorite recipes from Pinterest.  I am not a big cheesecake eater.  I usually like strawberry and that's it.  But I decided to make this for the holidays in 2011 and I ended up making like 5 or 6.  They were good...damn good.  And pretty easy too.  You can find the pin here.  The pic to the right is the pretty one from Pinterest.  My finished product is below.  Of course, it's not as pretty, but they never are.  It was amazingly good.  I don't know why I haven't made one recently.  I need to get on that.  Cause...ya know...my diet needs another saboteur.  But, I digress.  If you like cheesecake and you like chocolate chip cookies, then this one is for you.


My deliciousness!

This next one is super easy.  If you notice, that will be a recurring theme.  I see no reason to do things the hard way when there is a perfectly easy shortcut.  Ain't nobody got time fo dat!

I had been perusing Pinterest for hours one day when I came across this next pin (okay, well, it wasn't this exact pin, but one just like it).  I thought to myself...I really need this.  I had just started sewing and I was thinking about how to get this the way I wanted.  Here is the pin.  And here is the pretty as a picture photo op.  Apparently, the ones in this photo were for sale in the UK for a shit ton of money.

I guess...maybe...if they were in excellent quality and the fabric design I wanted...uh...yeah...no. 

But this idea was great.  And I decided P needed one.  I was really going to get the fabric and measure and cut and sew.  Because, you know, I had nothing better to do with my time.

 Luckily, I didn't start this right away.  I ended up coming up with a super time and money saving idea.   I happened to be at Goodwill (that's a second hand thrift store y'all) and I saw these 4 matching (and in good condition) pillow shams that matched P's bedding perfectly.  It was a lightbulb moment.  I took my 4 shams home and sewed them together.  They are shams, so you don't have to worry about pillows coming out of the sides or having to hide them.  I had originally planned to put decorative buttons on the back to keep the pillows inside, but that wasn't necessary.  I inserted those pillows and P had a super comfy place to watch tv or play games or take a nap on...etc.  Super cute eh?


It has 4 pillow sections, but we fold the top one under to make it more upright.  In reality, this is only as comfy as the pillows you put into it.  It folds up nicely and is easily washable.  Both of which are mom-approved.  Or mom-necessary.


Hopefully, you found this to be inspiring.  Or something.  Really.

Thanks for reading...

Oh and I hope you all have a safe and happy weekend.  I may or may not be running around naked slurring my Spanish in honor of Cinco de Mayo.  And that's before the beers.  Har Har.  Yeah...probably not.  But that doesn't mean you can't!!

Adios!


Pin It!

Thursday, April 25, 2013

Pinterest & Inspiration = Pinspiration

My plan is that once a week, I will try to recreate something I've found from Pinterest.  Whoever created Pinterest was a genius.  Women from all over flock by the millions.

So true!
I used to be a Pinterest addict.  I burned myself out.  But...I've been checking it out recently and I know that this summer I will want to get all kinds of crafty.  Until this semester is over, you will all have to just read about my previous undertakings.  I may cook up a recipe, but there won't be any big projects.

I'm going to start this Weekly Pinspiration with some easy ones I've done.  They also have the links to the pins where I found them.

First up...I literally just implemeted this.  I'm a stickler for organization and all the things we had been doing previously were falling short.  I use these plastic shoe holders on the back of just about every door in my house (pantry, hall closet, P's room).  I recently took the one off of my door and I remembered this pin.


 The Pinterest version can be found here.  The picture on the right is the one P has been using.  And it's been great.  I know, this was not a difficult craft or project, but I still think it's a great idea.  Go ahead...pin that shit!


 This next one is a little craftier.  And of course, nothing ever turns out exactly like Pinterest, but I still think it turned out well and I display it in my living room (sooo can't be all bad, right!?!).  The picture to the right is the Pinterest photo (duh).  You can find the pin here.  I upcycled a thrift store lamp.  The before and afters are below.  When I redo P's bedroom again, I'll be making her a scraps lamp.  I could have done a "better" job, but I like the shabby look.  It has character.  And although the Pinterest one is beautiful, it just looks like something you could buy from mass production.  If you want perfection, do NOT craft.


The last one I will leave you with is another one that I display in my living room.  This is actually one of my favorite things.  It turned out really really awesome.  It was extremely time consuming and a couple times, there was pain.  But is was definitely worth it.


The Pinterest version can be found here.  I used a wood plaque from the crafts section at Walmart.  I painted the edges purple (because I love purple) and then Mod Podged the scrapbook paper on top.  I printed a map of AR from the internet and taped it in place.  Then just hammer your nails in place.  It is extremely tedious.  I wouldn't recommend this project if you live in a place like NC or VA.  They have too many crevices.  The center heart is placed over your hometown or current residence.  Take thread or twine and just start looping.  You will have to loop the center heart several times per nail depending on how many nails your state outline required.

So there you are.  My Weekly Pinspiration for this week.  Hope you enjoyed.


Happy Pinning
and
Happy Reading


Pin It!